
Windows 10 is getting better and better with every update Microsoft pushes out, but still, you might be wondering how to get the best performance out of your Windows 10 Machine. The following tips and tweaks will improve your Windows 10 experience. We’ve all been there,sometimes our PC’s boots up very slow, sometimes our PC’s gradually become slow or it just suddenly comes to a standstill and sometimes we want to run the latest games or software but at the same time we don’t want to run out to the nearest shop and buy an expensive high-end PC or a laptop, because, for obvious reasons, it is expensive. So we try to run these graphics-intensive games on our everyday laptops and PCs which are just not built for it. If that is the case, you must have run in to latency issues, low FPS, and crashes. Well in this article we will look at some simple tweaks you can do to optimize Windows 10 to get the best performance possible. Following these steps will not make your Laptop/PC a high end gaming PC, but you will be able to get the best out of the hardware you have.
NOTE – You need to restart your system after each of these steps for them to take effect.
1.Update the Drivers
This is one of the most important steps. Make sure you have the latest drivers installed for your system and devices, especially your graphics card. You can grab the latest drivers for your AMD, Nvidia or Intel Graphics from their official websites, but i recommend using 3dGuru because they always have the latest drivers and they provide a description of what’s new.
- AMD[http://www.guru3d.com/files-categories/videocards-ati-catalyst-vista-win-7.html] Graphics Drivers
- Nvidia[http://www.guru3d.com/files-categories/videocards-nvidia-geforce-vista-%7C-7.html] Graphics Drivers
- For Intel Graphics use the official tool provided by Intel to keep the drivers up-to-date [http://www.intel.com/content/www/us/en/support/detect.html]
or you can use the official Websites for AMD and Nvidia.
- AMD [http://support.amd.com/en-us/download]
- Nvidia [http://www.nvidia.com/Download/index.aspx]
In both of the Official sites, you can use Automatic Detection feature, it will automatically detect your hardware and download the drivers for them.
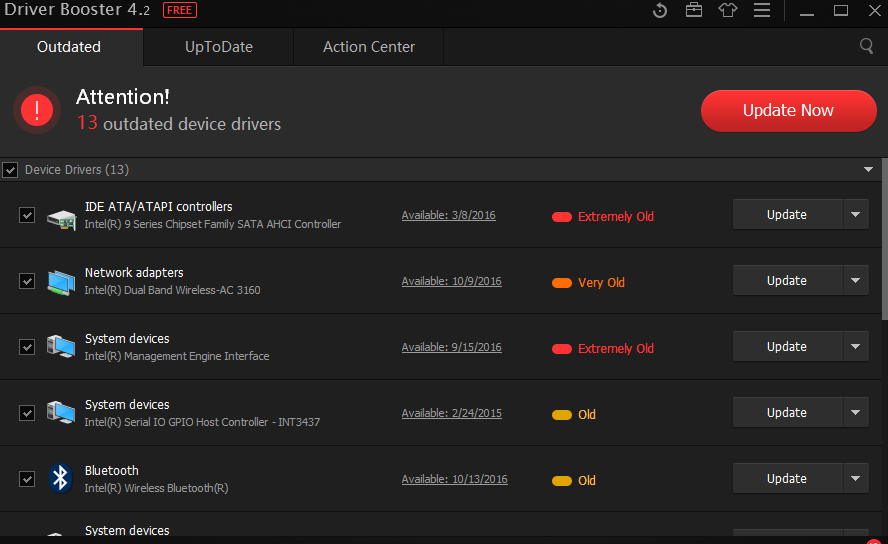
I prefer using IOBIT Driver Booster to keep all the drivers up-to-date, it will do a scan of your system and display all the outdated drivers on your system and you can click update now and it will automatically update the drivers for you! Easy and it is Free!.
IOBIT Driver Booster [http://www.iobit.com/en/index.php?AFF=86809]
Or you can use the official tools provided by Intel to keep the drivers up-to-date. [http://www.intel.com/content/www/us/en/support/detect.html]
2.Clean up your Disks
If you have been using Windows 10 for a while you most certainly have a lot of temporary files bulking up your hard drive. Most of these files are unnecessary, so it’s best to get rid of them. You can do this easily by using Windows Disk Cleanup Tool.
- To run Disk Cleanup.
- Press Windows Key + R
- Type clean manager and click OK
- Then select your main drive, that is where your OS is installed.
- Select all temporary files, log files, thumbnails and click OK.
- Again run Disk Cleanup Tool and this time click Clean system files.
- From here you can delete files of old versions of windows and update files that are left after installation.


3.Defrag the Disks
Most of you must have heard about Disk Fragmentation, for those of you who haven’t, read Disk Fragmentation [https://en.wikipedia.org/wiki/Fragmentation_(computing)]
Fragmentation slows down your system due to the ineffective organization of files on your hard drive. This can particularly hinder the performance of your computer. In most cases, Windows automatically takes care of defragmenting the disks but let’s go ahead and do it by ourselves just in case.
You can easily defrag your disks by the utility tool that comes along with windows, to run it.
- Go to settings and type defrag.
- Click Defragment and optimize Disks.
- Choose your main drive where your OS is installed.
- Click Optimize
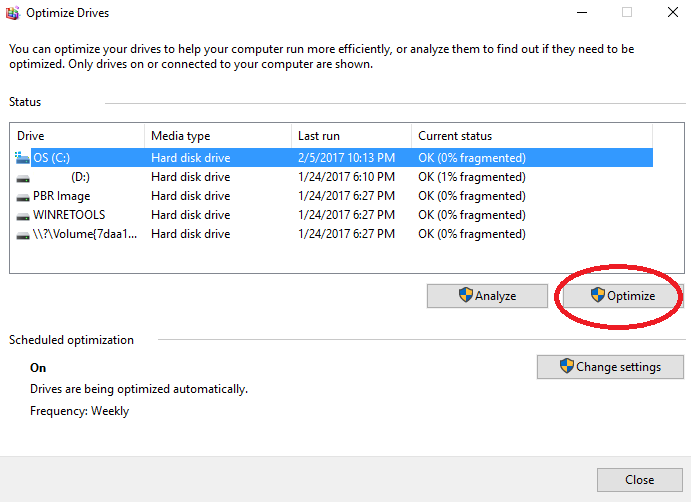
This will take some time, depends on how fragmented your drive is.
4.Adjust Windows 10 Visual Effects.
Now that you have updated your drives, deleted all the unnecessary files and defrag your Disks on to another important step.
Windows 10 looks pleasing to the eye, with seamless animations and striking graphics but all these come at a cost. Windows 10 visual effects take a toll on the resources your system has.
No one likes to use a dull user interface, but if you want to get the best performance out of the hardware you have, you will have to live with it at least when you’re running a demanding game or software. From my personal experience doing this gave me like 10-15 more FPS in most of the games.
You can adjust these settings just before you start to run any CPU, GPU, and RAM intensive task and it will free up your system’s resources.
To do this
- Go to Settings
- Type Performance in the search box
- Click Adjust Appearance and Performance of Windows.
- Click on Adjust for best Performance
- Click on Apply
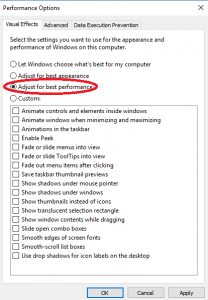
After you are done you can come back and click on Let windows decide what’s best and it will be back to the impressive Windows 10 User Interface,
or you can choose the Custom Option and adjust the visual effects for your liking.
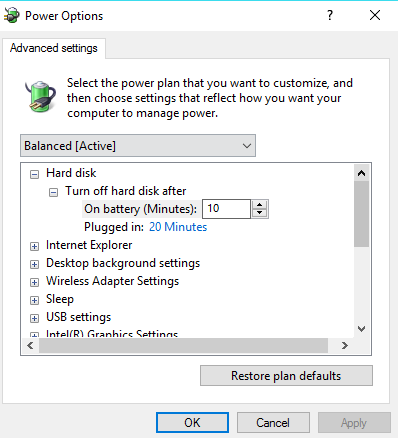
5.Adjust your Power Settings
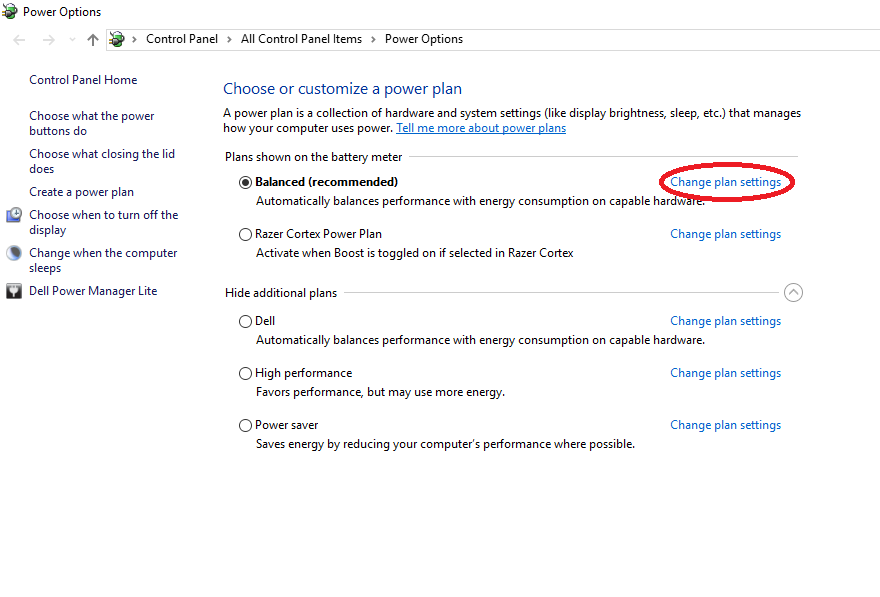
There are three power plans by default.
1.Power Saver
Power saver is a good option if you are using a laptop and you want your battery to last few extra hours without charging.
Power Saving mode attempts to save power by reducing the CPU’s speed all the time.
2.Balanced
Balanced is the default setting, balanced plan automatically increase the CPU’s speed when the computer needs it and slows it down when the computer doesn’t need the extra speed. This setting is fine for most of the tasks.
3.High Performence
High Performance never slows down the CPU’s speed even when the Computer doesn’t need the extra speed. All the other components like the hard drive will also not go into power saving modes in High Performance.
As long as you are not using Power Saver mode when Gaming you will use the full power of the CPU in both the balanced and high performance plans.
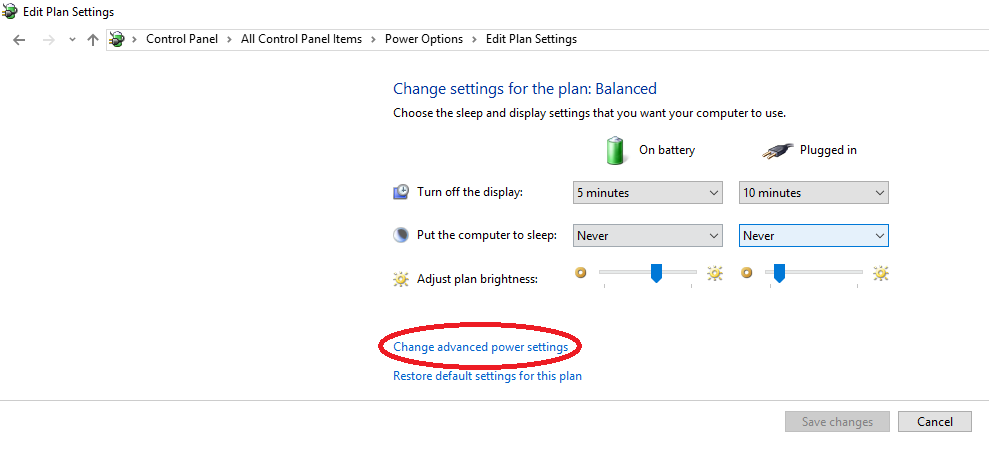
For a full breakdown of the differences among these plans and to manually edit the plans you can go to
- Click on the battery icon in the taskbar ->
- Click Power and sleep settings ->
- Additional Power Settings ->
- Change Plan Settings ->
- Change advanced power settings
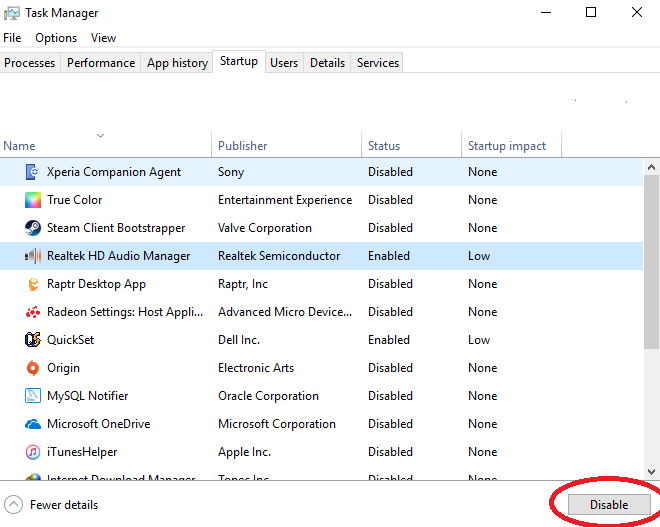
6.Disable Startup Programs
Windows automatically launches several programs at the startup, so that the user can instantly use those applications. The downside to this is that it can significantly affect the boot time and slow down your computer. So it is best to disable the programs that we don’t want Windows to automatically launch at startup.
To do this, Press CTRL+SHIFT+ESC and it will launch the Task Manager.
In the Task Manager navigate to the Startup tab and it will show you which programs are launched automatically at the startup and also show the impact it has on boot time of your Computer.
Select the programs that you don’t need at the startup and disable them. If there is a particular program that you are not sure about, just let it be.
7.Get rid of Application you don’t use
You might ask do these unused applications cause any harm to the Computer? The short answer is not really, but these applications take up valuable hard disk space and space in the memory. So it’s recommended to get rid of any applications that you don’t use anymore.
To Uninstall any application you can go to
- Control Panel ->
- Programs and Features and select the application you want and uninstall ->
- Click Uninstall

8.Check for Viruses and Malware
To keep away the viruses and malware you can use the in-built Windows Defender. If you think Windows defender is not enough there are tons of free anti-virus programs that do a decent job, that is if you don’t want to use a paid anti-virus program. One of the best malware clean up program that I also personally use is Malwarebytes Anti-Malware [https://www.malwarebytes.com/], it has been a top pick among many users. It is free so give it a try.
7.DirectX 12
If you’ve been using Windows 10 for some time, most probably you will have DirectX 12 installed. Nonetheless, some people don’t.
You can check the DirectX version you have, press Windows Key + R -> type dxdiag -> DirectX Version. If by some chance you don’t have DirectX 12 upgrade immediately. To get the latest versions of DirectX you will have to Update Windows, currently there is no standalone installer for DirectX 12 since DirectX 12 only supports Windows 10.
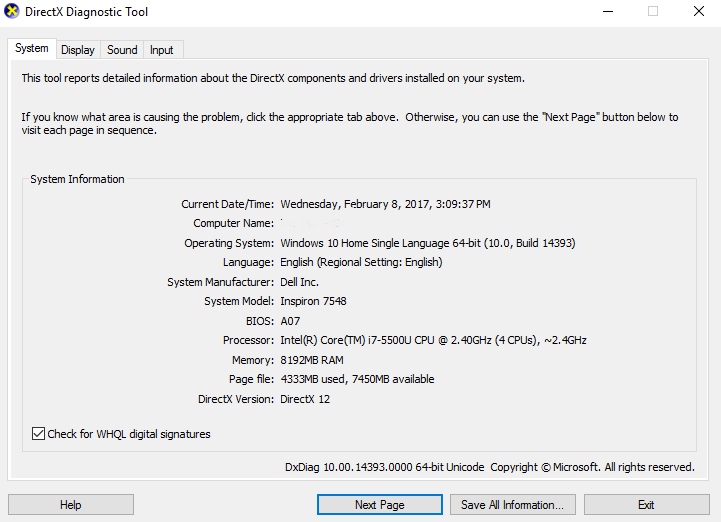
Note – Even if you have DirectX 12 Microsoft releases updates to DirectX via the Windows Update, so you should always keep Windows Up-to-date.
In Conclusion, these are some simple steps that will help you get the best out of your Windows 10 System and keep your System running smoothly. If there are any tips and tweaks that I have missed, feel free to mention them in the comments.


")


")
