
This doc demonstrates how to secure a multi-tenant ASP.NET Core MVC web application (TodoListClient) which calls another protected multi-tenant ASP.NET Core Web API (ToDoListService) with the Microsoft Identity Platform.
Scenario
In this sample, we would protect an ASP.Net Core Web API using the Microsoft Identity Platform. The Web API will be protected using Azure Active Directory OAuth 2.0 Bearer Authorization. The API will support authenticated users with Work and School accounts. Further on the API will also call a downstream API (Microsoft Graph) on-behalf of the signed-in user to provide additional value to its client apps.
The Web API is marked as a multi-tenant app, so that it can be provisioned into Azure AD tenants where the registered client applications in that tenant can then obtain Access Tokens for this web API and make calls to it.
#Note that the client applications that want to call this web API do not need to be multi-tenant themselves to be able to do so.
Overview
This sample presents a client Web application that signs-in users and obtains an Access Token for this protected Web API.
Both applications use the Microsoft Authentication Library MSAL.NET to sign-in user and obtain a JWT access token through the OAuth 2.0 protocol.
The client Web App:
1.) Signs-in users using the MSAL.NET and Microsoft.Identity.Web libraries.
2.) Acquires an Access Token for the Web API.
3.) Calls the ASP.NET Core Web API by using the access token as a bearer token in the authentication header of the Http request.
The Web API:
1.) Authorizes the caller (user) using the Microsoft.Identity.Web.
2.) Acquires another access token on-behalf-of the signed-in user using the on-behalf of flow.
3.) The Web API then uses this new Access token to call Microsoft Graph.

Pre-requisites
1.) Visual Studio
2.) An Azure Active Directory (Azure AD) tenant. For more information on how to get an Azure AD tenant.
3.) A user account in your Azure AD tenant. This sample will not work with a personal Microsoft account. Therefore, if you signed in to the Azure portal with a personal account and have never created a user account in your directory before, you need to do that now.
Setup
Step 1: Clone or download the following repository
From your shell or command line:
git clone https://github.com/Azure-Samples/active-directory-aspnetcore-webapp-openidconnect-v2.git

cd "4-WebApp-your-API\4-3-AnyOrg"
or download and extract the repository .zip file.
⚠️ Given that the name of the sample is quite long, and so are the names of the referenced packages, you might want to clone it in a folder close to the root of your hard drive, to avoid file size limitations on Windows.
Step 2: Register the sample applications with your Azure Active Directory tenant
There are two projects in this sample. Each needs to be separately registered in your Azure AD tenant. To register these projects, you can:
• either follow the steps below for manually register your apps
• or use PowerShell scripts that:
○ automatically creates the Azure AD applications and related objects (passwords, permissions, dependencies) for you.
○ modify the projects’ configuration files.
Follow the steps below to manually walk through the steps to register and configure the applications in the Azure portal.
Choose the Azure AD tenant where you want to create your applications
As a first step you’ll need to:
1.) Sign in to the Azure portal.
2.) If your account is present in more than one Azure AD tenant, select your profile at the top right corner in the menu on top of the page, and then switch directory to change your portal session to the desired Azure AD tenant.
Register the service app (WebApi-MultiTenant-ToDoListService-v2)
1.) Navigate to the Microsoft identity platform for developers App registrations page.
2.) Select New registration.
3.) In the Register an application page that appears, enter your application’s registration information:
• In the Name section, enter a meaningful application name that will be displayed to users of the app, for example WebApi-MultiTenant-ToDoListService-v2.
• Under Supported account types, select Accounts in any organizational directory.
• In the Redirect URI (optional) section, select Web in the combo-box and enter the following redirect URI: https://localhost:44351/api/Home.
4.) Select Register to create the application.
5.) In the app’s registration screen, find and note the Application (client) ID. You use this value in your app’s configuration file(s) later in your code.
6.) Select Save to save your changes.
7.) In the app’s registration screen, click on the Certificates & secrets blade in the left to open the page where we can generate secrets and upload certificates.
8.) In the Client secrets section, click on New client secret:
• Type a key description (for instance app secret),
• Select one of the available key durations (In 1 year, In 2 years, or Never Expires) as per your security posture.
• The generated key value will be displayed when you click the Add button. Copy the generated value for use in the steps later.
• You’ll need this key later in your code’s configuration files. This key value will not be displayed again, and is not retrievable by any other means, so make sure to note it from the Azure portal before navigating to any other screen or blade.
9.) In the app’s registration screen, click on the API permissions blade in the left to open the page where we add access to the APIs that your application needs.
• Click the Add a permission button and then,
• Ensure that the Microsoft APIs tab is selected.
• In the Commonly used Microsoft APIs section, click on Microsoft Graph
• In the Delegated permissions section, select the User.Read.All in the list. Use the search box if necessary.
• Click on the Add permissions button at the bottom.
10.) In the app’s registration screen, select the Expose an API blade to the left to open the page where you can declare the parameters to expose this app as an Api for which client applications can obtain access tokens for. The first thing that we need to do is to declare the unique resource URI that the clients will be using to obtain access tokens for this Api. To declare an resource URI, follow the following steps:
• Click Set next to the Application ID URI to generate a URI that is unique for this app.
• For this sample, accept the proposed Application ID URI (api://{clientId}) by selecting Save.
11.) All Apis have to publish a minimum of one scope for the client’s to obtain an access token successfully. To publish a scope, follow the following steps:
• Select Add a scope button open the Add a scope screen and Enter the values as indicated below:
‣ For Scope name, use access_as_user.
‣ Select Admins and users options for Who can consent?
‣ For Admin consent display name type Access WebApi-MultiTenant-ToDoListService-v2
‣ For Admin consent description type Allows the app to access WebApi-MultiTenant-ToDoListService-v2 as the signed-in user.
‣ For User consent display name type Access WebApi-MultiTenant-ToDoListService-v2
‣ For User consent description type Allow the application to access WebApi-MultiTenant-ToDoListService-v2 on your behalf.
‣ Keep State as Enabled
‣ Click on the Add scope button on the bottom to save this scope.
Configure the service app (WebApi-MultiTenant-ToDoListService-v2) to use your app registration
Open the project in your IDE (like Visual Studio or Visual Studio Code) to configure the code.
#In the steps below, “ClientID” is the same as “Application ID” or “AppId”.
1.) Open the ToDoListService\appsettings.json file
2.) Find the app key Domain and replace the existing value with your Azure AD tenant name.
3.) Find the app key TenantId and replace the existing value with ‘common’.
4.) Find the app key ClientId and replace the existing value with the application ID (clientId) of the WebApi-MultiTenant-ToDoListService-v2 application copied from the Azure portal.
5.) Find the app key ClientSecret and replace the existing value with the key you saved during the creation of the WebApi-MultiTenant-ToDoListService-v2 app, in the Azure portal.
Register the client app (WebApp-MultiTenant-ToDoListClient-v2)
1.) Navigate to the Microsoft identity platform for developers App registrations page.
2.) Select New registration.
3.) In the Register an application page that appears, enter your application’s registration information:
• In the Name section, enter a meaningful application name that will be displayed to users of the app, for example WebApp-MultiTenant-ToDoListClient-v2.
• Under Supported account types, select Accounts in any organizational directory.
• In the Redirect URI (optional) section, select Web in the combo-box and enter the following redirect URI: https://localhost:44321/.
#Note that there are more than one redirect URIs used in this sample. You’ll need to add them from the Authentication tab later after the app has been created successfully.
4.) Select Register to create the application.
5.) In the app’s registration screen, find and note the Application (client) ID. You use this value in your app’s configuration file(s) later in your code.
6.) In the app’s registration screen, select Authentication in the menu.
• If you don’t have a platform added, select Add a platform and select the Web option.
• In the Redirect URIs section, enter the following redirect URIs.
‣ https://localhost:44321/signin-oidc
• In the Logout URL section, set it to https://localhost:44321/signout-oidc.
7.) Select Save to save your changes.
8.) In the app’s registration screen, click on the Certificates & secrets blade in the left to open the page where we can generate secrets and upload certificates.
9.) In the Client secrets section, click on New client secret:
‣ Type a key description (for instance app secret),
‣ Select one of the available key durations (In 1 year, In 2 years, or Never Expires) as per your security posture.
‣ The generated key value will be displayed when you click the Add button. Copy the generated value for use in the steps later.
‣ You’ll need this key later in your code’s configuration files. This key value will not be displayed again, and is not retrievable by any other means, so make sure to note it from the Azure portal before navigating to any other screen or blade.
10.) In the app’s registration screen, click on the API permissions blade in the left to open the page where we add access to the APIs that your application needs.
• Click the Add a permission button and then,
• Ensure that the My APIs tab is selected.
• In the list of APIs, select the API WebApi-MultiTenant-ToDoListService-v2.
• In the Delegated permissions section, select the Access ‘WebApi-MultiTenant-ToDoListService-v2‘ in the list. Use the search box if necessary.
• Click on the Add permissions button at the bottom.
Configure the client app (WebApp-MultiTenant-ToDoListClient-v2) to use your app registration
Open the project in your IDE (like Visual Studio or Visual Studio Code) to configure the code.
#In the steps below, “ClientID” is the same as “Application ID” or “AppId”.
1.) Open the ToDoListClient\appsettings.json file
2.) Find the app key ClientId and replace the existing value with the application ID (clientId) of the WebApp-MultiTenant-ToDoListClient-v2 application copied from the Azure portal.
3.) Find the app key TenantId and replace the existing value with ‘common’.
4.) Find the app key Domain and replace the existing value with your Azure AD tenant name.
5.) Find the app key ClientSecret and replace the existing value with the key you saved during the creation of the WebApp-MultiTenant-ToDoListClient-v2 app, in the Azure portal.
6.) Find the app key RedirectUri and replace the existing value with the base address of the WebApp-MultiTenant-ToDoListClient-v2 project (by default https://localhost:44321/).
7.) Find the app key TodoListScope and replace the existing value with ScopeDefault.
8.) Find the app key TodoListAppId and replace the existing value with the application ID (clientId) of the WebApi-MultiTenant-ToDoListService-v2 application copied from the Azure portal.
9.) Find the app key TodoListBaseAddress and replace the existing value with the base address of the WebApi-MultiTenant-ToDoListService-v2 project (by default https://localhost:44351/).
10.) Find the app key AdminConsentRedirectApi and replace the existing value with “https://localhost:44351/api/Home”
Step 4: Run the sample
You can run the sample by using either Visual Studio or command line interface as shown below:
Run the sample using Visual Studio
Clean the solution, rebuild the solution, and run it. You might want to go into the solution properties and set both projects as startup projects, with the service project starting first.
When you start the Web API from Visual Studio, depending on the browser you use, you’ll get:
• an empty web page (with Microsoft Edge)
• or an error HTTP 401 (with Chrome)
This behavior is expected as the browser is not authenticated. The Web application will be authenticated, so it will be able to access the Web API.
Run the sample using a command line interface such as VS Code integrated terminal
Step 1. Install .NET Core dependencies
cd ToDoListService

dotnet restore
Then:
In a separate console window, execute the following commands.
cd ../

cd ToDoListClient

dotnet restore
Step 2. Trust development certificates
dotnet dev-certs https --clean

dotnet dev-certs https --trust
Learn more about HTTPS in .NET Core.
Step 3. Run the applications
In both the console windows execute the below command:
dotnet run
Open your browser and navigate to https://localhost:44321.
NOTE: Remember, the To-Do list is stored in memory in this ToDoListService app. Each time you run the projects, your To-Do list will get emptied.
Testing the Application
To properly test this application, you need at least two tenants, and on each tenant, at least one administrator and one non-administrator account.
The different ways of obtaining admin consent
A service principal of your multi-tenant app and API is provisioned after the tenant admin manually or programmatically consents. The consent can be obtained from a tenant admin by using one of the following methods:
1.) By using the /adminconsent endpoint.
2.) By Using the PowerShell command New-AzADServicePrincipal.
Consent using the /adminconsent endpoint
You can try the /adminconsent endpoint on the home page of the sample by clicking on the Consent as Admin link. Web API is provisioned first because the Web App is dependent on the Web API. The admin consent endpoint allows developers to programmatically build links to obtain consent.

#The .default scope
#Did you notice the scope here is set to .default, as opposed to User.Read.All for Microsoft Graph and access_as_user for Web API? This is a built-in scope for every application that refers to the static list of permissions configured on the application registration. Basically, it bundles all the permissions in one scope. The /.default scope can be used in any OAuth 2.0 flow, but is necessary when using the v2 admin consent endpoint to request application permissions. Read about scopes usage at Scopes and permissions in the Microsoft Identity Platform.
Since both the web app and API needs to be consented by the tenant admin, the admin will need to consent twice.
1.) First, the tenant admin will consent for the Web API. The Web API is consented first as the client Web app depends on the Web API and not the other way around.
2.) Then, the code will redirect the tenant admin to consent for the client web app.
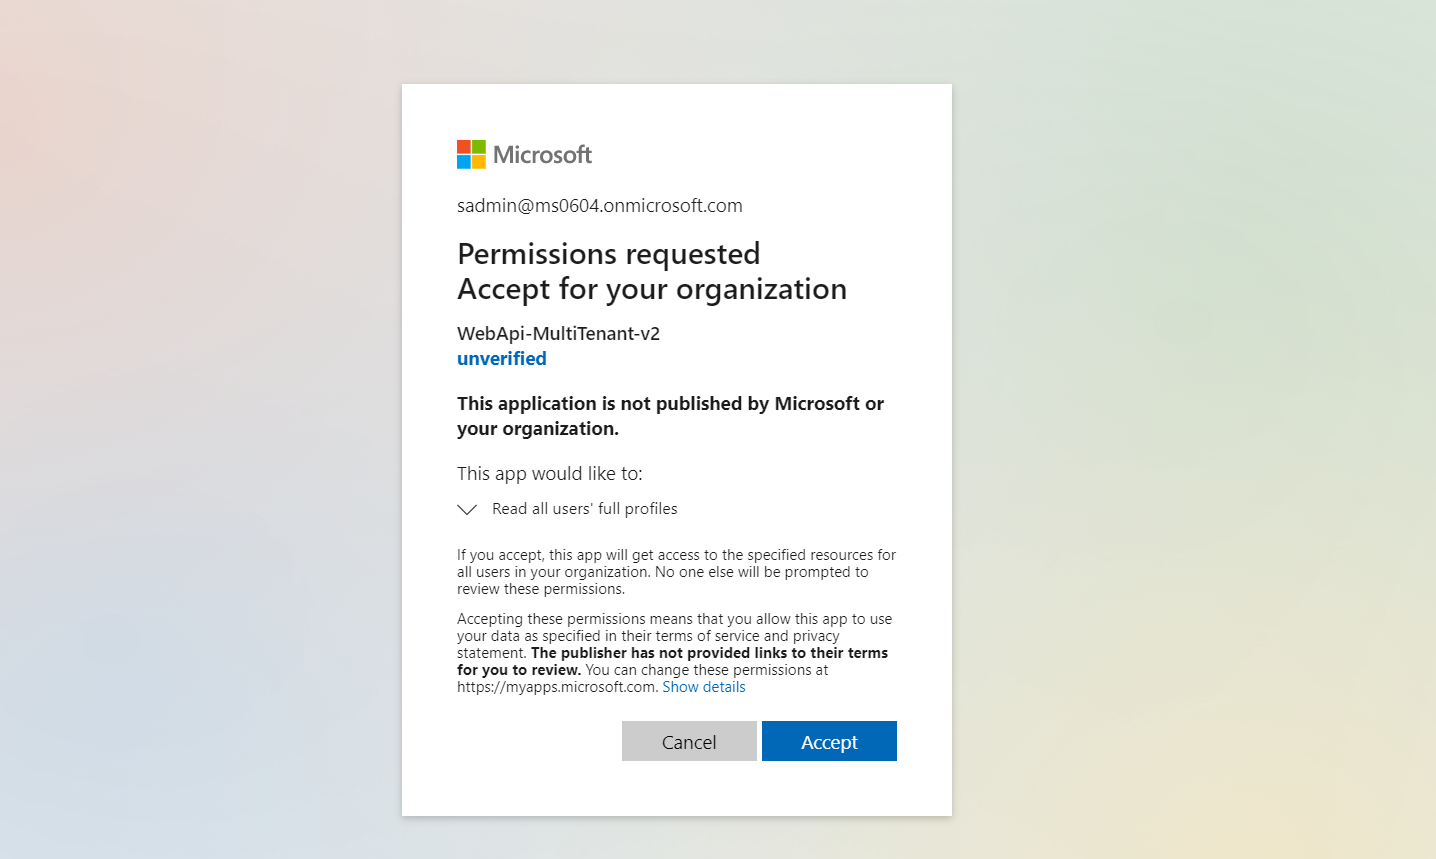
When redirected to the /adminconsent endpoint, the tenant admin will see the sign-in or the coose account screen:

After you choose an admin account, it will lead to the following prompt to consent for the Web API :
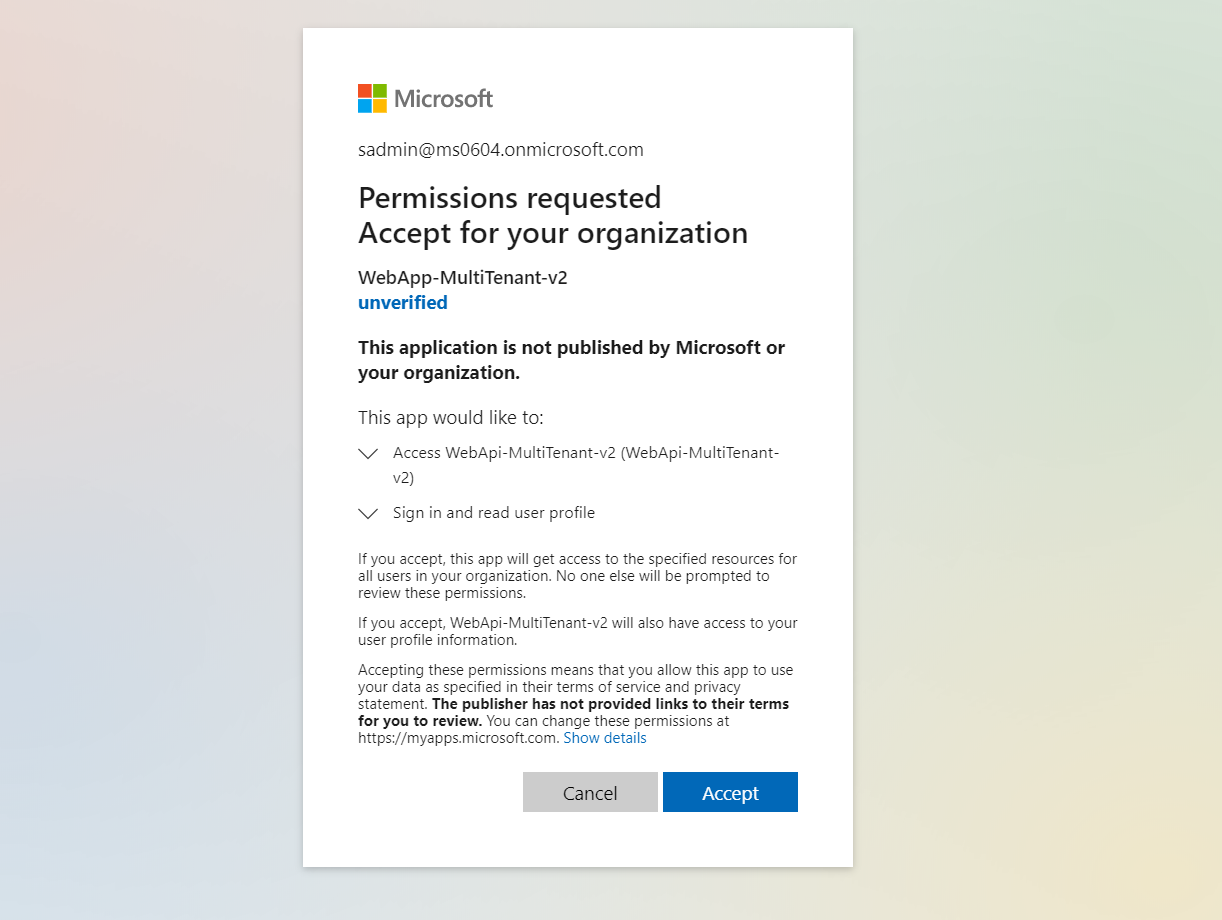
When you click Accept, it will redirects to /adminconsent endpoint again to obtain consent for the Web App:

After you choose an admin account, it will lead to the Web App consent as below:
Once it finishes, your applications service principals will be provisioned in the tenant admin’s tenant.
Consent using PowerShell
The tenant administrators of a tenant can provision service principals for the applications in their tenant using the AAD PowerShell Module. After installing the AAD PowerShell Module v2, you can run the following cmdlet:
Connect-AzureAD -TenantId "[The tenant Id]"

New-AzureADServicePrincipal -AppId '<client/app id>'
If you get errors during admin consent, consider deleting the service principal of your apps in the tenant(s) you are about to test, in order to remove any previously granted consent and to be able to run the provisioning process from the beginning.
How to delete Service Principals of your apps in a tenant
Steps for deleting a service principal differs with respect to whether the principal is in the home tenant of the application or in another tenant. If it is in the home tenant, you will find the entry for the application under the App Registrations blade. If it is another tenant, you will find the entry under the Enterprise Applications blade. Read more about these blades in the How and why applications are added to Azure AD.The screenshot below shows how to access the service principal from a home tenant:

The rest of the process is the same for both cases. In the next screen, click on Properties and then the Delete button on the upper side.

You have now deleted the service principal of Web App for that tenant. Similarly, you can delete the service principal for Web API. Next time, admin needs to provision service principal for both the applications in the tenant from which that admin belongs.
Explore the sample
1.) Open your browser and navigate to https://localhost:44321 and sign-in using the link on top-right.
2.) Click on To-Do List, you can click on Create New link. It will redirect to create task screen where you can add a new task and assign it to any user from the list.
3.) The To-Do List screen also displays tasks that are assigned to and created by signed-in user. The user can edit and delete the created tasks but can only view the assigned tasks.
About the code
Provisioning your Multi-tenant Apps in another Azure AD Tenant programmatically
Often the user-based consent will be disabled in an Azure AD tenant or your application will be requesting permissions that requires a tenant-admin consent. In these scenarios, your application will need to utilize the /adminconsent endpoint to provision both the ToDoListClient and the ToDoListService before the users from that tenant are able to sign-in to your app.
When provisioning, you have to take care of the dependency in the topology where the ToDoListClient is dependent on ToDoListService. So in such a case, you would provision the ToDoListService before the ToDoListClient.
Code for the Web App (TodoListClient)
In Startup.cs, below lines of code enables Microsoft identity platform endpoint. This endpoint is capable of signing-in users both with their Work and School Accounts.
services.AddMicrosoftWebAppAuthentication(Configuration)

.AddMicrosoftWebAppCallsWebApi(Configuration, new string[] { Configuration["TodoList:TodoListScope"] })

.AddInMemoryTokenCaches();
1.) AddMicrosoftWebAppAuthentication : This enables your application to use the Microsoft identity platform endpoint. This endpoint is capable of signing-in users both with their Work and School and Microsoft Personal accounts.
2.) AddMicrosoftWebAppCallsWebApi : Enables the web app to call the protected API ToDoList Api.
3.) AddInMemoryTokenCaches: Adds an in memory token cache provider, which will cache the Access Tokens acquired for the Web API.
The following code enables to add client service to use the HttpClient by dependency injection.
services.AddTodoListService(Configuration);
Admin Consent Endpoint
In HomeController.cs, the method AdminConsentApi has the code to redirect the user to the admin consent endpoint for the admin to consent for the Web API. The state parameter in the URI contains a link for AdminConsentClient method.
public IActionResult AdminConsentApi()

{

string adminConsent1 = "https://login.microsoftonline.com/organizations/v2.0/adminconsent?client_id="+ _ApiClientId

+ "&redirect_uri=" + _ApiRedirectUri

+ "&state=" + _RedirectUri + "Home/AdminConsentClient" + "&scope=" + _ApiScope;
return Redirect(adminConsent1);
}
The method AdminConsentClient has the code to redirect the user to the admin consent endpoint for the admin to consent for the Web App.
 public IActionResult AdminConsentClient()

{

string adminConsent2 = "https://login.microsoftonline.com/organizations/v2.0/adminconsent?client_id=" + _ClientId

+ "&redirect_uri=" + _RedirectUri

+ "&state=123&scope=" + _TodoListScope;
return Redirect(adminConsent2);
}
Handle the MsalUiRequiredException from Web API
If signed-in user does not have consent for a permission on the Web API, for instance “user.read.all” in this sample, then Web API will throw MsalUiRequiredException. The response contains the details about consent Uri and proposed action.
The Web App contains a method HandleChallengeFromWebApi in ToDoListService.cs that handles the exception thrown by API. It creates a consent URI and throws a custom exception i.e., WebApiMsalUiRequiredException.
private void HandleChallengeFromWebApi(HttpResponseMessage response)

{

//proposedAction="consent"

List result = new List();

AuthenticationHeaderValue bearer = response.Headers.WwwAuthenticate.First(v => v.Scheme == "Bearer");

IEnumerable parameters = bearer.Parameter.Split(',').Select(v => v.Trim()).ToList();

string proposedAction = GetParameter(parameters, "proposedAction");
 if (proposedAction == "consent")

{

string consentUri = GetParameter(parameters, "consentUri");
var uri = new Uri(consentUri);
var queryString = System.Web.HttpUtility.ParseQueryString(uri.Query);
queryString.Set(“redirect_uri”, _ApiRedirectUri);
queryString.Add(“prompt”, “consent”);
queryString.Add(“state”, _RedirectUri);
var uriBuilder = new UriBuilder(uri);
uriBuilder.Query = queryString.ToString();
var updateConsentUri = uriBuilder.Uri.ToString();
result.Add(“consentUri”);
result.Add(updateConsentUri);
throw new WebApiMsalUiRequiredException(updateConsentUri);
}
}
The following code in ToDoListController.cs catches the WebApiMsalUiRequiredException exception thrown by HandleChallengeFromWebApi method as explained above. Further it Redirects to consentUri that is retrieved from exception message. Admin needs to consent as user.read.all permission requires admin approval.
 public async Task Create()

{

ToDoItem todo = new ToDoItem();

try

{

...

}

catch (WebApiMsalUiRequiredException ex)

{

return Redirect(ex.Message);

}

}
Code for the Web API (ToDoListService)
Admin consent Client Redirect
In HomeController.cs, the method AdminConsent redirects to the URI passed in the state parameter by Web App. If admin consent is cancelled from API consent screen then it redirects to base address of Web App.
 public IActionResult AdminConsent()

{

var decodeUrl = System.Web.HttpUtility.UrlDecode(HttpContext.Request.QueryString.ToString());

var queryString = System.Web.HttpUtility.ParseQueryString(decodeUrl);

var clientRedirect = queryString["state"];

if (!string.IsNullOrEmpty(clientRedirect))

{

if (queryString["error"] == "access_denied" && queryString["error_subcode"] == "cancel")

{

var clientRedirectUri = new Uri(clientRedirect);

return Redirect(clientRedirectUri.GetLeftPart(System.UriPartial.Authority));

}

else

{

return Redirect(clientRedirect);

}

}

else

{

return RedirectToAction("GetTodoItems", "TodoList");

}

}
Choosing which scopes to expose
This sample exposes a delegated permission (access_as_user) that will be presented in the access token claim. The method AddMicrosoftWebApi does not validate the scope, but Microsoft.Identity.Web has a HttpContext extension method, VerifyUserHasAnyAcceptedScope, where you can validate the scope as below:
# HttpContext.VerifyUserHasAnyAcceptedScope(scopeRequiredByApi);
For delegated permissions how to access scopes
If a token has delegated permission scopes, they will be in the scp or http://schemas.microsoft.com/identity/claims/scope claim.
Custom Token Validation Allowing only Registered Tenants
By marking your application as multi-tenant, your application will be able to sign-in users from any Azure AD tenant out there. Now you would want to restrict the tenants you want to work with. For this, we will now extend token validation to only those Azure AD tenants registered in the application database. Below, the event handler OnTokenValidated was configured to grab the tenantId from the token claims and check if it has an entry on the records. If it doesn’t, an exception is thrown, canceling the authentication.
services.AddAuthentication(JwtBearerDefaults.AuthenticationScheme)

.AddMicrosoftWebApi(options =>

{

Configuration.Bind("AzureAd", options);

options.Events = new JwtBearerEvents();

options.Events.OnTokenValidated = async context =>

{

string[] allowedTenants = {/* list of tenant IDs */ };

string tenantId = context.Principal.Claims.FirstOrDefault(x => x.Type == "tid" || x.Type == "http://schemas.microsoft.com/identity/claims/tenantid")?.Value;
if (!allowedTenants.Contains(tenantId))
{
throw new Exception(“This tenant is not authorized”);
}
};
}, options => { Configuration.Bind(“AzureAd”, options); })
.AddMicrosoftWebApiCallsWebApi(Configuration)
.AddInMemoryTokenCaches();


")
