Hi everyone! From today onwards you are going to have a set of tutorial based articles on VS code with us. We welcome all of you for the awesome experience ahead!
When studying about a huge tree it is important to have a good idea how the small seed developed to the existing massive status step by step. Likewise it will be great to get an idea about the evolution of VS code to the existing status.
VS code was released for the first time, at the 2015 Build conference by Microsoft on April 29th. Finally VS code graduated the public preview and was released to the web on April 14th, 2016.
For the benefit of our beginners we’ll start from the very basics and reach to the advanced levels step by step.
VS code is a source code editing software. This was developed by Microsoft, for windows, mac-OS and LINUX operating systems. The specialty of VS code is that it provides the support for many programming languages. As well as VS Code can read and take use of a multiplicity of project files defined by different platforms and frameworks. This has the ability of providing an aid for the building of ASP.NET Web applications, XML Web Services, desktop applications, and mobile applications. Actually being a free, open-source software this is customizable by the users. This supports for syntax highlighting, intelligent code completion, debugging, embedded Git control, code refactoring and snippets.
Now you have a basic understanding about the functionalities of the VS code. Now it’s the time for a proper start!
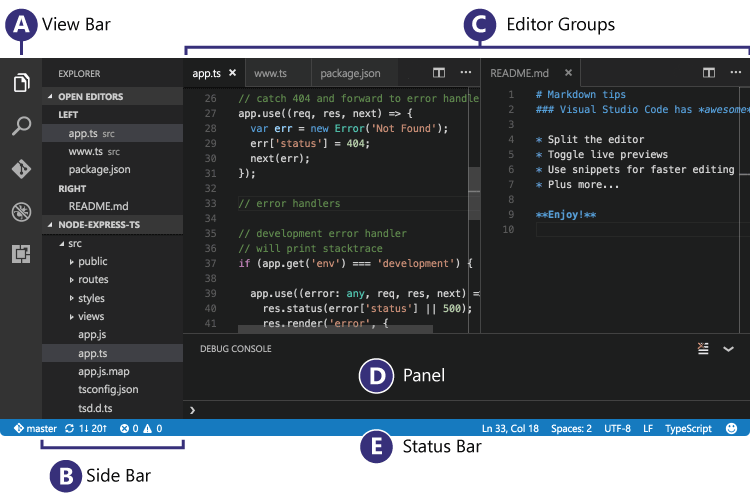
VS code has a simple and attractive user interface. A user can identify five main sections within the VS code’s lay out.

- Editor- This is the area we are going to open our files for editing purposes. Maximum 3 editors can be opened side by side.
- Status bar-This contains the information about the opened projects and file we are going to edit.
- View bar
- Side bar- Located at the left most regions on the user interface. This bar includes 5 options. Those are explorer, search, git, debugging and extensions.
- Panels- This depicts the output or debugs information, errors and warnings, or an integrated terminal.
VS code allows you to open number of files. Tabbed headers of the opened files are displayed at the top part of the editor region.
Definitely you guys might be interested in the next part that we are going to present you in this article. Herewith we have included some easy ways to customize the VS code user interface.
| Hiding the menu bar | Hiding the menu bar from the window |
|
|---|---|---|
| Zen mode | Focus on your code by hiding all UI except the editor |
|
| Side by side editing | Maximum of three editors can open side to side |
|
The explorer at the side bar allows to browse, open and manage all of the files and folders of the project.
After opening a folder in VS Code, the contents of the folder are shown in the Explorer. You can do many things from here:
- This allows moving of files and folders with drag and drop.
- Creating, deleting, and renaming files and folders are enabled in this region.
- Use the context menu to explore all options.
VS has a special ability of working with other tools like command prompt. To access the command prompt right-click the folder and select “Open in Command Prompt “ (or “Open in Terminal” on Mac or Linux).
You can also navigate to the location of a file or folder in the native Explorer by right-clicking on a file or folder and selecting Reveal in Explorer (or Reveal in Finder on the Mac or Open Containing Folder on Linux).
Open Editors
You guys could get a list of active files or previews at the area of open editors. These are the list of files you opened previously when you started working on. A file could include in this set of open editors due to following reasons.
- If you make a change to a file.
- Double-click a file’s header.
- Double-click a file in the Explorer.
- Open a file that is not part of the current folder.
If you click on an item at the open editors it becomes the active part in VS code. After finalizing your task you can remove files open editors.
You can remove files individually from the OPEN EDITORS section, or you can remove all files by using the “View: Close All Editors” or “View: Close All Editors in Group” actions.
Hope you all enjoyed the article. Let’s meet with another article soon.
Sources:
https://code.visualstudio.com/docs/editor/codebasics


