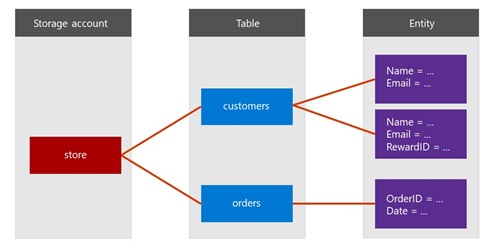
Using Azure Storage account you can create schemaless, NoSQL document databases with Azure Tables. This is a very straight forward way to create NoSQL databases than any other NoSQL databases compared. Azure Table works as a key/attribute store with a schema-less design.

Access to Azure Storage is done through a storage account it contains a storage account name and connection string to access. A table is a collection of entities that collectively keep together. An entity is an object that keeps a set of properties, similar to a database table row. Lastly, a property is a name-value pair since there is no schema it can be different from each row.
STEP 1
Got to Azure portal and search for Storage account and then select the storage account as follows
Now you have to fill up all the related details as follows.

STEP -2
When you have created the Storage Account you can go inside it and get the access keys from the left side menu. You can go inside Access Key and copy one of the keys from two keys in the Access Key section. (either one – no need both) Save it in a note pad for us to use later.

STEP -3
Now let’s create a Console app using Visual Studio (use .NET version 4.0 or higher) to your console application add the following Nuget Packages.
STEP – 4
Now add a new class to the project name it “Employee”. Add the following code inside in it.
Before adding the following contents for the employee class add the namespace reference – using Microsoft.Azure.CosmosDB.Table;
public class Employee : TableEntity

{

public Employee(string lastName, string firstName)

{

this.PartitionKey = lastName; this.RowKey = firstName;

}

public Employee() { }

public string Email { get; set; }

public string PhoneNumber { get; set; }

}
STEP -5
Now go back to the Main method in the Program.cs file. Add the following namespaces :
using Microsoft.Azure;

using Microsoft.Azure.Storage;

using Microsoft.Azure.CosmosDB.Table;
var account = CloudStorageAccount.Parse("{Connection String Copied }");
In the above give your connection string copied from the Azure Portal. Now after the above put the following code to go ahead!
var client = account.CreateCloudTableClient();

var table = client.GetTableReference("Employee");

table.CreateIfNotExists();
Employee employeeEntity = new Employee("Dileepa", "Rajapaksa") };
{ Email = "[email protected]",
PhoneNumber = "+94711919490"
TableOperation insertOperation = TableOperation.Insert(employeeEntity);

table.Execute(insertOperation);
Following is a screenshot of what its looks like in my code:

Now when you run this and navigate to Azure Storage Explorer section in the Azure Storage account you’ll see the data has been created!

How easy it is to work with Azure Table in C# !…. Tryout other operations as well with TableOperation the class which we have used here.


