
In this article you will learn how slot swapping works and how to make a swap. You’ll also learn how to manually and automatically route traffic to different slots.
App Service’s deployment slot feature is a valuable tool for previewing, managing, testing, and deploying your different development environments.
Staging environments
When you deploy your web app, web app on Linux, mobile back end, or API app to Azure App Service in the Standard, Premium, or Isolated App Service plan tier, you can use a separate deployment slot instead of the usual production slot. Live apps with their own host names are known as deployment slots. The production slot is one of two deployment slots where app content and configuration pieces can be switched.
The following are some of the advantages of deploying your application to a non-production slot:
- Before replacing the staging deployment slot with the production slot, you can test the app modifications.
- By initially deploying an app to a slot and then swapping it into production, all instances of the slot are warmed up before being switched into production. When you deploy your app, you won’t have any downtime. No requests are dropped due to traffic redirection, and no requests are dropped due to swap operations. When pre-swap validation isn’t required, you can configure auto swap to automate the entire process.
- The slot containing the previously staged app now has the prior production app after a switch. If the modifications switched into the production slot don’t work out, you can conduct the same swap again right away to restore your “last known good site.”
The number of deployment slots supported by each App Service plan tier varies. Using deployment slots comes at no additional cost.
Slot swapping
When you switch slots (for example, from a staging slot to a production slot), App Service does the following to avoid downtime in the target slot:
Apply the following settings to all instances of the source slot from the target slot (for example, the production slot):
- Slot-specific app settings and connection strings, if applicable.
- Continuous deployment settings, if enabled.
- App Service authentication settings, if enabled.
Allow for the restart of all instances in the source slot. The swap process reverts all modifications to the source slot and quits if any instance fails to resume.
If local cache is enabled, make an HTTP request to the application root (“/”) on each instance of the source slot to initiate local cache activation. Wait for each instance to respond with an HTTP response. Each instance is restarted after the local cache is initialized.
If auto swap is enabled with custom warm-up, make an HTTP request to the application root (“/”) on each instance of the source slot to initiate Application Initiation.
Swap the two slots by swapping the routing rules for the two slots if all instances on the source slot have successfully warmed up. The program that was previously warmed up in the source slot is now in the target slot (for example, the production slot).
Perform the same action by applying all changes and restarting the instances now that the source slot has the pre-swap app that was previously in the target slot.
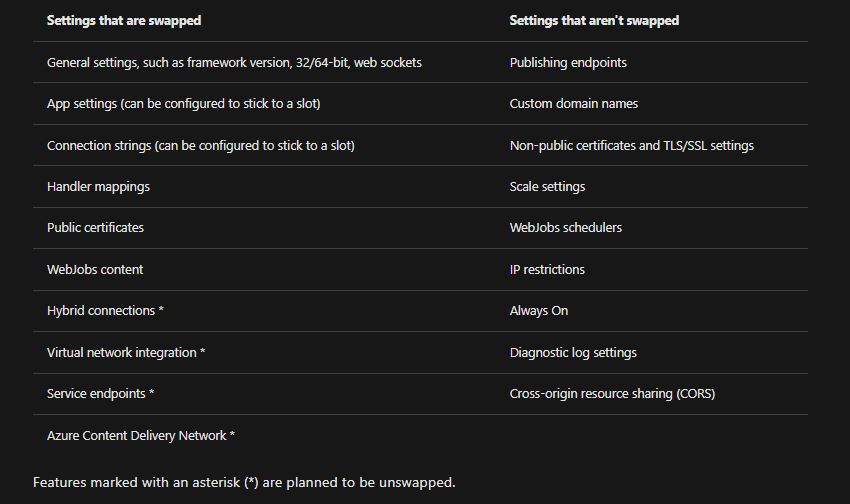
The parameters that change when you shift slots are listed in the table below.
Swap deployment slots
Manually swapping deployment slots
To switch deployment slots, do the following:
- Select Swap from the Deployment slots page of your program. The Swap dialog box displays the parameters that will be modified in the specified source and target slots.
- Choose the Source and Target slots that you want. The production slot is usually the aim. Select the Source Changes and Target Changes tabs as well, and make sure the configuration changes are what you intend. When you’re finished, select Switch to immediately swap the slots.
- Don’t pick Switch; instead, follow the instructions in Swap with preview below to see how your target slot will perform with the new settings before the swap takes place.
When you’re finished, select Close to close the dialog box.
Swap with preview (multi-phase swap)
To replace preview with:
- Switch deployment slots in the same way as before, but choose Perform swap with preview. The dialog box displays how the source slot’s configuration changes in phase 1, as well as how the source and destination slots’ configurations change in phase 2.
- Select Start Exchange when you’re ready to begin the swap.
- You’ll be told in the dialog box after phase 1 is complete. Go to https://app name>-source-slot-name>.azurewebsites.net to see the switch in the source slot.
- Select Complete Exchange in Swap action and Complete Swap when you’re ready to finish the pending swap.
- Instead, pick Cancel Exchange to cancel a pending swap.
When you’re finished, select Close to close the dialog box.
Configure auto swap
To set up auto swap, follow these steps:
- Select the deployment slot you wish to arrange to auto swap from your app’s resource page. The option may be found under Configuration > General settings.
- Set the Auto Swap option to On. Then, in the command bar, pick the desired target slot for Auto change deployment slot and Save.
- Push a piece of code to the source slot. After a brief period of time, the auto switch occurs, and the change is reflected in the URL of your target slot.
In this article you learned how slot swapping works and how to make a swap. And also learned how to manually and automatically route traffic to different slots. Hope you can use your knowledge in real life with this.


")


")
